

Becoming a partner and making money on YouTube used to be hard. Only a select few were allowed and they were usually invited by the site, sometimes with a personal phone call. Now you can make money on YouTube just by enabling monetization in your account settings. As long as you created all of your own content, or have a license to use content that you did not (i.e royalty free music), you are almost guaranteed acceptance into YouTube’s partnership program.
It is easy to monetize YouTube videos, but it is not easy to earn money off of them. How much money you make per ad will depend on which ads are run in your videos and how much of a cut YouTube is taking. More popular videos get higher paying ads, and more popular YouTubers are able to negotiate better ‘CPM’s with YouTube. CPM means ‘cost per thousand’. YouTubers can expect to make between $0.30 and $2.50 CPM, although there is a lot of variation. If you earn $0.30 for every thousand people who click on an ad then it will take you a long time to make any significant money.
All that means is that if you are serious about turning your vlog into a source of income you have to really work at it. Create amazing content and promote your videos well; it will take a while, but your channel will start to get attention. Once your vlog starts to be successful you might be able to make some real money.
This article will walk you through enabling monetization, including linking your YouTube account with your AdSense account (both of which exist under the umbrella of your Google account). Then, there will be a walkthrough of how to monetize your videos. They will not be automatically monetized after you enable monetization.
1.Ten Steps to Monetizing Your Channel
1. Go to your Account Settings and, under Channel, select Status and features.
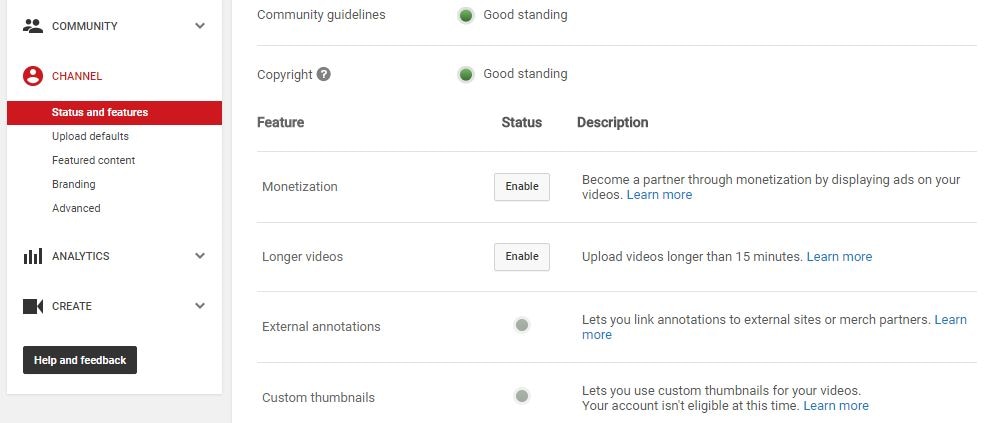
2. Click on Enable next to Monetization.
3. In the next screen, click the blue Enable my Account button.

4. The YouTube Partner Program Terms will pop up. Compared to a lot of the “Terms” you are asked to read and agree to when signing up for things online the Partner Terms are fairly short and readable.
5. After reading the terms there are three boxes you will need to check to proceed. The first is to confirm that you read the Terms. The second box is a promise not to click on the ads in your own videos to try to create profits artificially.
The third box requires you to promise not monetize content that you do not own. The most extreme version of this would be stealing somebody else’s video and trying to monetize it on your channel. However, using a song or sound effect in your video you do not have the rights to also counts. There are a lot of places you can get free music to use in your monetized videos, and YouTube’s own Audio Library is one of them.
6. After you have checked all the boxes and moved on you will see a pop up explaining how to monetize your individual videos.
Your channel is now monetized, but you will not be able to earn money until you have linked your channel to your AdSense account.
7. There will be a reminder to link your channel and your AdSense account in the next screen. Click on the Link my account button. Or, go to Google.com/adsense and click Sign Up Now. Either method will take you to the Welcome to AdSense page.
8. Click Sign In to sign in to your Google account, which is the same as your YouTube account.
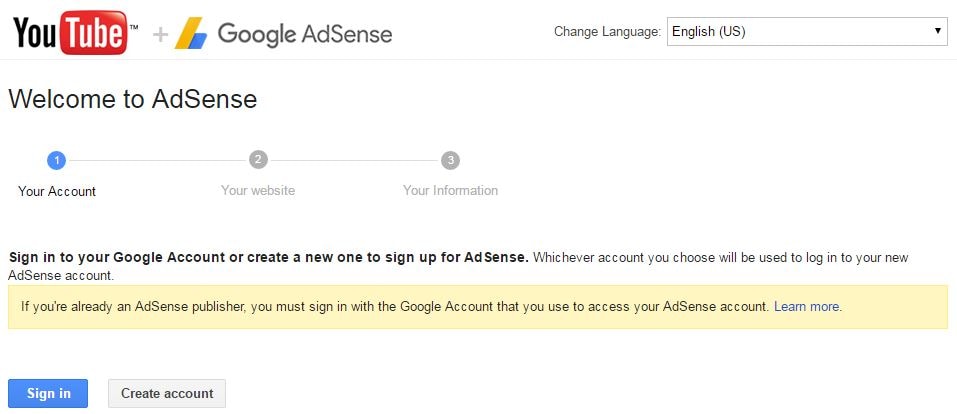
9. After you have signed in it will show you your channel url next to My website and give you a chance to change your language. Click Continue.
10. The last step is to fill out all your contact information before you submit your application. Your approval should come within two days.
2.4 Steps to Monetizing Your Videos

1. Go to your Video Manager and check the boxes next to all the videos you want to enable ads for.
2. Click on Actions and then select Monetize.
3. In the window that pops up you will be given a chance to choose what kinds of ads you want to allow in your videos. You must also specify here if you have included paid product placement in your video.
4. Wait for the review process to finish and ads to start appearing in your videos. If you are using any licensed, royalty free, content (like a music track) then YouTube may ask you to prove you have the rights to it.
How To Make Money on YouTube
By yuzay
Listed below is the hardware you will need to purchase and assemble. Basically, you are building a custom open-frame PC, but instead of one or two graphics cards (as you would find in a gaming computer), you will be adding SIX to the build requiring riser cables and a frame

Power Supply – 1000 Watt Power Supply – The key here is to have an efficient 1000 watt power supply that will save you over the long run in electricity costs. Look for Gold or Platinum rated (as opposed to silver or bronze). This is the industry standard for rating the efficiency of a computer’s power supply unit (PSU).
Motherboard/CPU Combination – What is the best motherboard for mining Ethereum? I’ve listed below my favorite motherboard and processor combo that is compatible with 6 video cards. This is the ethereum mining motherboard that is used in large scale mining deployments. If the pros use it, you know it’s good.
6x Graphics Cards (GPUs) – Nvidia GTX 1070 – The very efficient Nvidia GTX 1070 can produce 30Mh/s using only 100 watts of electricity. It is much more power efficient than the other GPU’s in this list. Anyd of the twin fan overclocked Gigabyte or EVGA cards work great out of the box. I find that eBay often has these in stock when Amazon is sold out.
RAM (System Memory) – 4 GB RAM – You don’t need a lot of system memory to mine ethereum effectively. 4GB is about as small as a stick of RAM comes these days, so I recommend just picking up a cheap one.
USB Riser Cables – (6 pack) USB Riser Cables – These are to connect the 6 graphics cards to the motherboard and allow spacing between cards for heat dissipation. These are necessary when building a rig with this many GPU’s.
1x Custom Mining Case – I’d recommend an Open Air 6 GPU Mining Case.I’ve built several of these 6 GPU rigs for family and friends using this particular mining case works quite well for airflow and ease of building.
Operating System – Eth OS ethOS is a free 64-bit linux OS that mines Ethereum, Zcash, Monero, and other GPU-minable coins on AMD GPU’s. If you are using the Nvidia 1070 GPU’s, I recommend mining on Windows 10, since Eth OS has some driver issues with Nvidia cards.
Assembling the Custom Ethereum Mining Hardware
- Un-package everything
- Build / assemble Open Air 6 GPU Mining Case
- Install processor and RAM on motherboard
- Plug in all riser cables
- Place motherboard in custom open air mining rig case and connect motherboard PSU connector (leaving PSU unplugged from the wall of course)
- Plug in SATA hard drive (or optional Linux on USB stick)
- Connect all GPUs to riser cables and fasten them to custom case. You might need to experiment for optimal spacing to keep the cards cool.
- Plug in all power supply connections.
- Connect mouse, monitor and keyboard and an internet connection (I use a USB WiFi adapter)
- Check all connections once more
- Fire it up! Install ETH OS.
- Make sure fans are fully functional. Start the mining software, tweak settings for maximum hash rates and let it run!
Motherboard, Windows and Mining Software Configuration
- Update the motherboard to the latest BIOS using a USB thumb drive. You can find the latest BIOS for the Z170 SLI Plus motherboard here.
- Configure Motherboard BIOS with the following settings changes:
- Settings > Advanced > PCI subsystem Setting: PEG 0 and PEG 1 set to Gen1
- Above 4G Decoding (cryptocurrency mining) should be set to Enabled
- OS settings: disable Windows 7, enable Windows 10
- Save and reboot
- OS / DRIVERS / MINING Setup:
- Boot from Windows 10 USB install media (you can buy it pre-loaded or build your own on the Microsoft website).
- Install Windows 10 Pro x64
- Install Nvidia Drivers
- Install MSI Afterburner and set memory clock to 600, and power to 70. This will give you 30Mh/s per 1070 GPU
- Install any system drivers that didn’t auto-install (check device manager)
- Rename PC to mining worker name. Something like Minion001, Minion002, etc.
- Install Claymore Dual Miner, edit the config file with your Ethereum address and miner name. Drop a shortcut to the mining software .exe file in your system startup folder if you’d like to auto-start mining when Windows boots up. You can find the system startup folder in Windows 10 by going to: Start > Run and entering ‘shell:startup’.
- Disable windows update using this guide.
- Set power profile to ‘always on’
- Install your favorite remote access software, especially if you plan to have more than one rig to manage.
- Fire up the mining rig and rake in those crypto coins!
Something I’ve done when building out a whole mining farm, is to do the OS/DRIVERS/MINING setup and then just clone the solid state drive using a 2 bay hard drive dock with offline clone feature built in.
Congratulations! You are now the proud operator of your very own custom built 6 GPU ethereum mining rig.
6 GPU Ethereum Mining Rig Build Guide
By yuzay
Subscribe to:
Posts (Atom)


